Wednesday, December 24, 2008
Holiday Season
I would like to take this opportunity to wish everyone who visits my little page a wonderful Holiday Season and a safe New Year! Look forward to talking more about the new products in the new year!
Monday, December 22, 2008
Sending Revit Files to Consultants
I had an interesting call the other day with an Electrical designer that received an Architectural file from the firm they were working with. The arch file was over 275MB and they had trouble linking the file into their MEP file. They tried opening the file to see if they could even open it...but they got the system memory errors and couldn't open the file. They finally were able to open the file on someone's pc without memory warnings, but when they attempted to save it though, no go. So I had them do a Purge Unused and then try to save it...which worked. When we checked the new file size, it went down to ~45MB!! This file of course could then be linked into the MEP file without trouble.
So what's the point of this you may ask? When you are sending files out to your consultants, do them a favor (not to mention yourself) and do a little cleanup! Even if you don't want to purge your working file, detach a copy (if it's a central file) and purge that copy. It will save time copying the file to the FTP site or whatever you are using to share your files and potentially save your consultants some headaches! Or, the call from them saying they can't use your file!
Tuesday, December 16, 2008
Autodesk to Acquire BIMWorld
Just in case you haven't seen the press release, Autodesk "signed a definitive agreement to acquire substantially all of the assets of BIMWorld". You can read the press release here. Looks like the Autodesk Seek website will be expanded quite a bit in the near future!
Friday, December 12, 2008
Change Image in Revit Title Block
There's been some discussion on AUGI on tying a Parameter to an Image so things like stamps can be changed in the title block. This can be done, except that you have to insert an image into a family...generic annotation family is a nice one to use.
I would like to give credit to Aaron Bergmann for pointing out this can be done in this AUGI post. Thanks Aaron!!
Here's the steps you'll need to use to make this happen...
- Start a new Family and use the Generic Annotation.rte
- Insert an image into the Generic Annotation family.
- Go to Settings->Family Category and Parameters.
- Check the box for Shared in the bottom pane.

- Save it with an appropriate name and load it into your Title Block family.
- Use the Symbol Tool to insert the new Image Family.
- !!NOTE!! You may not see the image when you initially bring it in. Place it near where you want it, then move or align it. There should be a dot for the insertion point of the family when you go to move or align.

- With the image family selected, go to Element Properties.

- When in Element Properties, select the gray box for Visible. Add a new parameter to control the Visibility of the image family. Give the parameter name something similar to the image you want to control. Don't call them Image 1, Image 2, etc. I also made mine Type based so I can change the visibility across the board instead of each individual title block.
- If you have multiple images that you would like to turn on/off, repeat the same process for each image family.
- Once the image families have been set with a Visibility Parameter, go to Family Types. Uncheck what you do not want to see and check what you want to have on by default. If you want a blank space, leave them all unchecked.
- !!NOTE!! The images will not change visibility in the Family Editor. Testing whether or not you've attached the correct parameter to the correct family will have to be done in a project.
- Save the Title Block family and Load it into your project.
- Once the title block family is loaded in the project, all you have to do is select one of the title blocks and go to Element Properties. Go to Edit/New to access the Type Parameters and check and uncheck away.

Extra little tip...controlling the size of the image. Since the image has to be adjusted in the generic annotation family, measure the distances (area) in the title block that you want the image to fit into. You can then either re-create this area in the annotation family or, copy-clip and paste the lines that make up the area for the image into the annotation family. Just remember to remove the lines when you're done sizing the image. :)
And...if you want to use formulas to help aid in not having more than one image on at a time, here's something I did for this example. If you have two checks in the top parameters, no logo will be displayed. The lower parameters (under Other) are the actual Parameters tied to the Families. The Parameters under Graphics are ones I created in the Family Types to drive the others.

Wednesday, December 10, 2008
Labels Can't be Kept Readable in Tags
This is a true statement believe it or not. I was working on a Room Tag which called out some finishes and at times needed to be rotated Vertical so it could fit into a space. To my surprise, when the Tag was set to be Vertical, the text that was vertical on the side of the tag and now on the top of the tag was upside down.

Ok, so the Keep Readable checkbox must be unchecked for the Label. Open up the family and check the props of the Label...Keep Readable is checked...interesting. So, I check the usual source of AUGI and the only thing that I could find was there was a check box in the Family Category and Parameters to keep Text Readable...for a Annotation Family and not a Tag.
Well, sent the issue along with the family to Autodesk to see what they had to say about it. Here's the response that I received...
I’m sorry this functionality isn’t available in Revit. Thank you for pointing out this issue. I'll make it a wishlist item and send your service request to our development team. If you have any other product related feedback that you'd like to give, you can do so on our website at http://usa.autodesk.com/adsk/servlet/index?siteID=123112&id=1109794. Thank you for your patience.
So now what you may ask? In the case I'm working with we'll either make a second tag for vertical instances or maybe make another Label in the family that is "upside down" and tied to a visibility parameter to allow users to check a box to swap out the correct Label orientation. Interesting piece about the whole thing...the Label acts appropriately in the Family! So if you do happen to rotate your Labels in the Family, just be aware you may get some undesired results. Or in my case, maybe desired results with this potential work-around.
I can't stress enough for people to utilize the link above to submit any feedback they have about Revit!! The more users bang the door on issues, the more chance things will get looked at and potentially pushed to the top of the wishlist.
Monday, December 1, 2008
Standards Manager-Checker for Revit
The folks over at Avatech Solutions have come out with what looks to be a nice little tool called BIMreviewTM, which is the first and only plug-in for the Autodesk® Revit® platform that automatically validates the accuracy and consistency of building information models against project, firm, national or user-defined standards and provides automatic correction.
You can check out more information on the BIMreviewTM product here, along with viewing a short e-demo and even downloading a 30 day trial.
Revit Skills Assessment Module from CADsmart
CADsmart today (Dec. 1, 2008) announced it is releasing a fully interactive skills assessment module for Revit Architecture, which is the first of it's kind. They are showcasing the assessment at Autodesk University this week (Dec. 2 -5) for those of you lucky enough to be out in Vegas!
The Revit Architecture module is the first in a series of planned BIM skills assessment tools; it will swiftly be followed by assessments for Revit Structure and Revit MEP in early 2009.
CADsmart’s live skills assessment software works inside the Revit platform, so candidates are using the tools, as they would at their work station. The assessment covers 10 core areas of basic Revit skills; basic element creation, views & sheets, detailing, annotation & keynotes, component placement, dimensions & rules, importing DWG, families and parts, scheduling and coordinates & orientation.
You can check out the full press release here or check out the CADsmart site for more information.
Friday, November 28, 2008
Revit Architecture Service Pack 3 Available
It figures that while I was on vacation (so I apologize for being a little tardy on posting this), Autodesk released web update/service pack #3!
Web Update #3 Service Pack – November 2008
Important Note:
Web Update #3 is not a full install; rather it is using Service Pack technology similar to AutoCAD® based products. Prior to installing the Web Update #3 Service pack, please verify that you have already installed a previous build of Revit Architecture 2009.
Before You Download
Please read before downloading and installing:
Service Pack Readme (pdf).
Get Started
Read all instructions above then click the appropriate link to download.
Revit Architecture 2009 Web Update #3 Service Pack (32-bit) (exe - 128 MB)
Revit Architecture 2009 Web Update #3 Service Pack (64-bit) (exe - 54 Mb)
Notes:
Here's a quick glance at the updates for this service pack...
Improvements made in Web Update 3 build (20081118_1045):
Revit Architecture 2009/ Revit® Platform Enhancements
- Slab Edges when joined to their hosting Floor will now be able to cut the floor when the user manually remakes the join.
- Improves visibility of Color Fills for certain interior wall conditions.
- Improves IFC Export for Walls and MEP elements.
- Improves stability when using the Split tool.
- Improves stability when using Temporary Hide/Isolate functionality in 3D view.
- Improves stability when binding a linked Revit file into a project.
- Improves stability when switching between views.
- Improves stability when selecting any of the column headers on the CAD Formats tab of the Manage Links dialog.
Wednesday, November 19, 2008
WAN Access at LAN Speeds for Revit?
I can't tell you how many times I've been asked this question...do WAN accelerators work for Revit? The answer has always been no, especially for Central files. But, maybe that's about to change...
For those of you who are attending (AU) Autodesk University (whish I could be joining you) this is something you may want to check out. See below on the information I received today...
GlobalSCAPE at AutoDesk University 2008
The next release of our Wide Area File Services (WAFS) solution supports Revit. The same advanced WAFS file replication technology that has improved AutoCAD remote worker productivity gives users in branch offices LAN speed access to Revit files.
Come by our booth (#214) at Autodesk University and and let us show you how GlobalSCAPE WAFS dramatically improves Revit project team collaboration. Register for a free one year personal edition subscription to GlobalSCAPE's CuteSendIt large file transfer service and a daily drawing at Autodesk University for an Apple iPod Touch. We look forward to seeing you at Autodesk University.
I look forward to hearing more about the product when more info available for those of us not going to AU!
Tuesday, November 18, 2008
2009 AIA BIM Awards - Call for Entries
I just received an email today I thought I would share for those of you how may want to submit some of your projects for a potential AIA BIM award!
AIA Technology in Architectural Practice
Building Information Modeling Awards
Presented by the AIA Technology in Architectural Practice (TAP) Knowledge Community
For the 2009 Building Information Modeling (BIM) Awards competition, the AIA TAP Knowledge Community seeks projects that have used integrated and interoperable BIM in the following areas:
- Category A: Creating Stellar Architecture Using BIM
- Category B: Design/Delivery Process Innovation Using BIM
- Category C: Outstanding Sustainable Design Using BIM
- Category D: Outstanding Design for Fabrication Using BIM
- Category E: Support for Human Use and Innovative Program Requirements Using BIM
- Category F: Academic Program or Curriculum Development
For More Information
Specific criteria for each award category as well as the necessary forms and submission details are available on the BIM Awards Web site.
SCHEDULE AND DEADLINES
January 15, 2009 - Submissions due to the AIA
March 2009 - Winners notified
April 29, 2009 - BIM Awards presentation prior to AIA 2009 National Convention in San Francisco
CONTACT
If you have questions concerning this awards program, please contact Shaw Hubbard.
Monday, November 17, 2008
Edit Witness Line Issue Update 2
Well, I finally received an answer from Autodesk Support on the issue I posted about back on Oct. 10. And the news is good and bad...
The good news is that the problem is going to be fixed! But the bad news is that it's not going to be very soon. It is scheduled to be fixed in a near future version of Revit. Reading between the lines, I'm guessing it's not going to be fixed until Revit 2010 is released. Maybe I'll be surprised by a service pack (if they come out with one) before then, but I'm not holding my breath.
And if I am surprised, I'll post that it's been fixed!
Sunday, November 2, 2008
Revit Architecture Updated Extensions Available
Yes, I'm pretty tardy on posting this (they were released on Oct. 10), but I did want to post that the new version of the extensions for Revit Architecture are available via the Subscription Center.
From the subscription site...
Revit® Extensions are a series of easy-to-use applications that extend the capabilities of Revit® Architecture 2009 software in key areas, including modeling, coordination, and documentation. Specifically, the extensions provided in this executable file are: Grid Generator, Freeze Drawings, Compare Models, Text Generator, Elements Positioning, and Microsoft Excel®-based Model Generation.
The file installs the Revit Extensions for Revit Architecture 2009. It also includes the Extensions Engine, a platform that hosts each Extension within Revit Architecture 2009.
Please note that the multi-language executable file contains content in English, French, Italian, German, Simplified Chinese, and Polish. Revit Extensions for Revit Architecture 2009 are now compatible with the 32-bit and 64-bit versions of Revit Architecture 2009 software.
Hopefully I'll be able to post more frequently in the near future, but I guess being busy these last few weeks is a good thing!
Tuesday, October 14, 2008
AUGI CAD Camp Recap
Just a real quick post to thank all of the people that attended the Chicago AUGI CAD Camp today (Oct. 14)! I believe there were over a hundred attendees from all lines of work (including Manufacturing people). I got to meet quite a few new people, see some that I haven't seen in a while and best of all, give a presentation to about 30 users! I want to personally thank all of you for choosing (at least I hope you wanted to be there :-), just kidding) my session out of the other 5 sessions that were available. I know we as presenters aren't competing against each other, but it was great to see all but 5 or 6 chairs full!
Hopefully you learned something in the session and like I said at the end, please let me know if you have any questions. Thanks Again!!
Edit Witness Line Issue Update
Yes, there is an update to the previous issue I posted on about Dimension text moving around when editing the witness lines. Well, there's actually a couple updates and they are not all good...
First, the(somewhat)good news. It appears you can edit witness lines to the right and the dimension text will not relocate itself. Thanks to fellow AGUI member Andre Carvalho for pointing this out.
Now, to the bad. If the dimension is vertical, it actually matters which direction you draw the dimension and which side you are editing witness lines. Example, if you draw the dimension from bottom-up and go to edit the top witness line, the dim text will stay where you moved it. If you go to adjust the bottom, the moved dim text goes back to the "home' position. And of course, reverse it if you drew the dim from top-down.
And the other bad...yes, there's another! If you add text to your dimension (above, below, prefix or suffix) and got to edit your witness lines (in any direction I might add, vertical or horizontal) the added text WILL DISAPPEAR!! I couldn't believe my eyes when I saw this...and see for yourself in the video below.
Stay tuned...I'll update this subject again (hopefully all good) when I find out more information or get a solution from Autodesk.
Friday, October 10, 2008
Edit Witness Lines and Dim Text Moving Issue
A problem has come up and it's very interesting...editing witness lines and the dimension text moving if an existing dimension text has been moved from it's "home" location. It even looks like the added dimension text isn't placed in the correct location.
Take a look at the video below to see what happens.
So, for the time being...don't edit witness lines if you've moved any text in your dimensions and want to add to it. Just create a new dimension string.
I submitted this to Autodesk and it's currently being investigated by the development team...seems like the story of all the issues I run into!
Tuesday, September 30, 2008
Revit 64bit Extensions Available
Some may have already seen this if you've been on the Subscription Site, but they have updated some of the extensions for the Revit platform...mainly the Globe Link, Workshare Monitor and Batch Print.
Little tip...you can sort the downloads by the date so you can see exactly what is new on top.
Little tip...you can sort the downloads by the date so you can see exactly what is new on top.

Revit Architecture 2009 64-bit is Here!
YES, IT"S FINALLY HERE!! Log into the Subscription Site and go to Product Downloads to download the 64bit Revit Platform along with the Release Notes and Known Issues.
NOTE: Be sure to read the Release Notes before installing this version!!
Welcome to the 64‐bit edition of Revit® 2009 platform products. This release takes advantage of the additional memory available to applications in a 64‐bit operating system environment. 32‐bit Microsoft® Windows® operating systems, when properly configured, are limited to providing between 3GB and 4GB of memory to applications. From a software standpoint, there is no practical technical limit to the amount of memory available to compatible applications under 64‐bit Microsoft Windows operating systems, although the hardware platform may impose some technical restrictions on the amount of RAM that may be installed in a given workstation.
Revit 2009 platform 64‐bit product performance is expected to be similar to an identical Revit model edited with Revit 2009 platform 32‐bit products. However, due to the potential for the Revit platform to access greater quantities of memory made available by the Windows operating system running with more installed RAM, the Revit platform may exhibit increased stability.
Thursday, September 25, 2008
Web Update (SP) 2 Now Available for Revit Architecture
EDIT: Yes, its actually ready for download on the Autodesk website publicly.
Web Update 2 is ready for download on Autodesk's website via the Revit Architecture Service and Support page or from the links below...
The Web Update can be downloaded here... (English Version)
http://revit.downloads.autodesk.com/download/2009/RAC2009_WU2_SP_ENU.EXE
The Web Update Enhancement List can be downloaded here...
http://revit.downloads.autodesk.com/download/2009/RAC2009_WU2_List.pdf
And here's a little something that is nice to see...it's more like a service pack than a new install!
Web Update #2 Service Pack – September 2008
Important Note:
Web Update #2 is not a full install; rather it is using Service Pack technology similar to AutoCAD based products. Prior to installing the Web Update #2 Service pack, please verify that you have already installed the First Customer Ship build or Web Update #1 build of Revit Architecture 2009.
Here's a quick snapshot of what's included in the WU from the pdf...
Improvements made in Web Update 2 build (20080915_2100):
Revit Architecture 2009/ Revit® Platform Enhancements
Improves the ability to link markups made in a DWFx file.
Improves the ability to view thumbnail previews in Microsoft® Windows® XP x64.
Decal bump image map will now import at correct scale for cut-out.
Floors containing multiple slopes and walls will now export to IFC correctly.
Improves the display of colors in shaded views to be more consistent with the 2008 Revit product line.
Export to DXF/DWG will now export the Material's color_map texture.
Mass Floors no longer disappear when adding text to Mass Element comments.
Improves stability of worksharing when saving to central.
Improves visibility of common edges when joining in-place family.
Improves stability when accessing Pantone dialog.
Improves stability when upgrading project or family from the 2008 version of a Revit product.
Improves stability when selecting elements in a 3D view.
Moving a model pattern with a face-based family constrained to it no longer causes a constraint error.
Improves stability when switching between views.
Improves stability when importing DWG files.
Improves performance when adding or editing walls in models with rooms.
Improves stability when creating a section.
When exporting to DWG, the ceiling pattern will now export correctly.
After a project is upgraded to the 2009 version of a Revit product, the linework will now display as set in previous version.
Enables “Show family pre-cut in plan views” parameter for structural framing category family so that the geometry can be cut by the cut plane in medium and fine views.
API Enhancements
By following a modified install procedure, VSTA can now run with non-administrative user permissions. Please see the Revit VSTA User Manual in the Revit SDK package for complete details.
New AIA Contract Documents for BIM, IPD
The AIA has announced the upcoming release of six new AIA Contract Documents on October 17, 2008, including a new BIM exhibit, as well as two new Integrated Project Delivery (IPD) agreements, two new Design-Build agreements and a Scope of Services document. These new documents, collectively called the 3.5 Release, begin to address the working relationships between parties when incorporating BIM technologies moving toward Integrated Practice.
See the official press release through the link below...
http://www.aia.org/press2_template.cfm?pagename=release_092408_condocs
Tuesday, September 23, 2008
Revit Application Comparison
I've been asked many times about the differences are between Revit Architecture, Revit Structure and Revit MEP? Are they the same with different tool sets? Is Structure the same as Arch with expanded tool set? Is MEP Arch with an expanded tool set? Can I get all 3 in one?
Well, you can't get all 3 in one (man, I sure hope Autodesk can do something about this!!). As for the other questions about the differences between the 3 apps, there are a few things that are different. One of those is being the families that come with each product. I hope to soon look at the main differences and will post and update when I do.
Another is the External Tools that are available to each product. For example, Arch and MEP will not allow you to tie your model to a Structural Analysis program like Structure can. MEP, will allow you to tie into Trane Trace, but Arch and Structural cannot. Just take a look at the Extensions provided by Autodesk...there is a separate set for each program.
The next and maybe the most asked is the actual tools that are in each program. Well, there are many commands that are available in all 3, some in 2, some in just one. I've put together a document that lists out the command tools between the 3 products. I did not list every single command tool, just the ones that are not available in all 3 via the pull-down menus. You can download the document HERE.

Thursday, September 11, 2008
Add a Hyperlink to a Family Type
Ever need/want to "attach" a document or provide a web link to an object? Well, this can be accomplished by going to the Type Parameters and entering a value for the URL. The key to adding a value for the URL is actually typing in the value or better yet, utilize Copy Clip and Paste. The little button with the 3 dots (actual name is Ellipsis button if you ever wondered) isn't what you hit to get the value...it actually takes you to the value specified.

There is one wish though...have the "URL" accessible via a Ctrl+Click (or something) at the object so you don't have to go into the Type Parameters to select the Ellipsis button to open the "URL". One thing you can do to somewhat get around going into the Type Parameters is to create a schedule and include the URL as a Field. At least this way, you can save yourself a few mouse clicks and dialog boxes.
Monday, September 8, 2008
AUGI Chicago CAD Camp is Here
Register Here to attend AUGI CAD Camp - Chicago!
Thousands of design professionals attend AUGI CAD Camp each year because they've learned it offers training and networking benefits they can't get anywhere else in a single day. Join us for our next event on October 14th in Chicago at the Wyndham O'Hare Hotel.
This information-packed event offers you the opportunity to select from 25 different courses to customize your learning experience, and help you work better, smarter and faster.
And...I'll be the instructor for the following session!
(S3 - 3)Demystify Detailing in Revit® Architecture
Skill Level Guideline: Intermediate
Learn to take advantage of the extensive detail library and detailing tools provided with Autodesk® Revit® Architecture 2009. In this session you will learn techniques to successfully create model-based details, and leverage drafting views and 2D detail components. We will then pull it all together with creating a view-based detail library and leverage existing AutoCAD-based details. This session is for any Revit Architecture user who wants to gain a comprehensive understanding of detailing in Revit Architecture.
Don't wait to take advantage of this opportunity. Register now and save $25 over the regular tuition price.
AUGI Member Rate
AUGI (Autodesk User Group International) membership is FREE! Click here to join AUGI.
• Early Bird Discount* (before 9/25/08)
$207.00
• Standard fee (after 9/24/08)
$233.00
Standard Rate
• Early Bird Discount* (before 9/25/08)
$233.00
• Standard fee (after 9/24/08)
$259.00
Student Rate
• Must show valid Student ID
$125.00
Thursday, August 7, 2008
AutoCAD Revit Architecture Suite 2009.1
There is an update to the Revit Suite product line that will be available around mid-September. The update though is not to Revit, it's actually adding AutoCAD Architecture to the bundle! That's right, Revit Architecture Suite will now (well, soon anyway) include Revit Architecture, AutoCAD and AutoCAD Architecture. This was just shared with the Autodesk reseller community and more details will be available in the next couple weeks. Stay tuned!!
Again, I just want to re-iterate that this is NOT an update or service pack to ANY of the products listed...this point release is only being done to redo the Suite bundle for Architecture. The version of Revit Architecture that will be shipping with this Suite release is Web Update 1.
NOTE: This 2009.1 release will be English only for FY09.
Monday, August 4, 2008
Changing Parameters from Type to Instance - Revisited
I was reading a post by Brian Renehan @ Revit Fix about changing parameters that are in the out-of-the-box families. As I previously posted, you don't have to go through these steps to change from Type to Instance...there is a check box you can use in the Options Bar.
This got me thinking and testing as well...since you can modify one of these "system" parameters based on Brian's post, what happens if you try to delete or modify the name. Well, here's what I found...
The image below is what I did when I changed the Category to Generic Model and modified the Height Parameter. I changed it to say "Height Test", made it Instance Based and changed the parameter category to Other.

Then, I changed the Family Category back to Casework and took a look at the parameters again. Interestingly the Height parameter came back... as a Type Parameter and without a Value. The Height parameter that I had modified was still present with the changes that I made, and was the parameter that was being used for the dimension label.


So the parameters that you see in the templates are really built into the programming of the family category. If you really want to see what parameters are built into a family, start a family as a Generic family and then change it to another Category. The Generic family basically only consists of the parameters in Identity Data and when you change it to another Category, the parameters built in will appear.
Friday, July 25, 2008
Revit® Extensions for Revit® Architecture 2009
Something new to play with!! Log into the Autodesk Subscription Center and go to the Architecture, Engineering & Construction (AEC): Product Modules & Add-Ons section to get to the page to download the tools. They don't exactly put new things on the top, so you have to navigate in the list to find it...here's the screen shot of what I saw. Note: Your list may be different than the image below.

Revit® Extensions are a series of easy-to-use applications that extend the capabilities of Revit® Architecture 2009 software in key areas, including modeling, coordination, and documentation. Specifically, the extensions provided in this executable file are: Grid Generator, Freeze Drawings, Compare Models, Text Generator, Elements Positioning, and Microsoft Excel®-based Model Generation.
As I have time (which hasn't been a lot lately), I will report back on some of the extensions. Enjoy!!
Wednesday, July 23, 2008
New Service Pack for Revit Suite Products
I saw this title - Autodesk Releases Service Pack 1 for Revit Architecture - on TenLinks Daily yesterday and thought I would clarify what it meant. This is NOT a service pack for Revit...it is a service pack for the AutoCAD portion of Revit Suite (Architecture and Structure). There are 4 separate downloads for the AutoCAD 2009 Service Pack 1...AutoCAD LT, AutoCAD, AutoCAD Revit Architecture Suite and AutoCAD Revit Structure Suite.
Please make sure you download the correct service pack for the version of AutoCAD you are using. And remember, Revit uses Web Updates not Service Packs for the updating process.
Wednesday, July 2, 2008
Structural Link Showing Blue Dots at Columns
I get this question every once in a while when some of the Architectural firms start working with Structural firms that are using Revit Structure...what are these blue dots at the columns and how do I get rid of them??

Well, these blue dots are really the analytical representation of the structural column from the link. They may not always show up, it really depends on how the structural view were created and/or how the Visibility Graphics are set in the Architectural file. Here's how to get rid of them if they do show up...
- Go to Visibility Graphics for the view
- Click on the Revit Links tab
- Under the Display Settings (next to the Structural Link) click By Host View to get to the RVT Link Display Settings
- Under the Basics tab, select Custom and then go to the Model Categories tab
- Under Model Categories, change <by host view> to <Custom>
- Under the All and None buttons, make sure to check "Show categories from all disciplines"
- Scroll down to Structural Columns and expand to see the Analytical Model sub-category
- Uncheck the Analytical Model sub-category and OK out of the dialogs.

Now the analytical representation, or blue circles, are gone from the columns.

Basically, if you see any blue circles on the Structural Link regardless of the View your looking at, it's displaying the Analytical representation. Use Visibility Graphics to get rid of them...because they will print if you leave them turned on.
Monday, June 30, 2008
BUG - Sweeps using Pick Path Option
This one comes courtesy of fellow AUGI member patricks. He posted that he "discovered that sweeps with picked paths instead of sketched paths will not display a surface pattern when a material is applied. This occurs in both in-place families and regular families."
I was able to confirm this (with and without Web Update 1) and submitted a SR (Support Request) to Autodesk. Here's their response...
Thank you for contacting Autodesk Support. I have submitted this issue to our development team and will let you know their findings/recommendations as quickly as possible.
So for now, if you are creating a family with a sweep and want a material with a surface pattern, do not use the Pick Path option until we get a fix.

I'll post an update as soon as I receive one.
Sunday, June 29, 2008
Linked File Cannot Be Saved Error Message

I've had a few clients get this message in the past and seen a few posts on AUGI as well. Many have said that it's a meaningless message and that is can be ignored, but it's an annoyance and usually messages in Revit mean something.
This past week I had a client get it again and the linked Revit file hadn't been touched in quite some time, so it was really puzzling. Usually, you can just open the linked file, save it, close it, then reload the link and be go to go...but this time that didn't work. So I sent the message to Autodesk and here's the response I received...(I added the bold and underline to point out a few things)
Thank you for contacting Autodesk Support. I apologize this issue is occurring as I know it must be frustrating. Our development team is working to correct this on a future release.
If a linked RVT file contains a linked DWG (or other "CAD format") file, and the DWG file has changed on disk since the last time the linked RVT file was saved, then when the linked RVT file is loaded (as a link) the DWG file is reloaded which Revit interprets as a modification.
As long as your client is not trying to make any changes related to shared coordinates, the message is harmless and can be ignored. But if they are trying to do something related to shared coordinates (including moving an RVT link that uses shared coordinates), the message will prevent those changes from being saved.
A workaround is to open the linked RVT file that the message complains about, save it, and close it. That should save the RVT link with the latest version of the DWG links inside it, so that when it is later opened as a link the message will not appear. Of course, the message will reappear when a DWG file is modified again, until the RVT link is re-saved.
So it appears that it is a harmless message as long as you are not doing anything with shared coordinates. This message has been coming up in a few releases of the software now, so hopefully the development team can come up with a solution. And if they do, hopefully it's not like the Wall Sweep fix that wasn't documented.
And yes, once everyone STC and closed local files, they were able to open the link, save, close and the message went away.
Thursday, June 26, 2008
Sweep Updates in 2009
I was in the process of writing up a post on wall sweeps and how you have to make sure that the origin point of the profile ("insertion" line of the sweep) cannot even touch the edge of an opening, or it will break the sweep. It was something I've been meaning to do and an AUGI post that I responded to finally got me motivated. ;-)
Well, I was getting the images ready (in 2009) and unbeknown to me, the sweep didn't break at the edge of the opening like it was supposed to!?!?! What the heck is going on... did I not put the sweep exactly at the window sill elevation...was the sweep "insertion" line not in the correct position...I was somewhat dumbfounded. I went back to 20008 and did the exact same thing and the result was what I was expecting...the sweep broke at the sill of the window.

So what is the deal. Well, I went back to look at the release notes for RAC2009 and I did not see anything about updates to the sweeps. Leave it to Autodesk to throw in some updates and let us figure (stumble) upon them on our own. It appears that you CAN have a sweep run along an opening and the sweep will not break if the "insertion" line touches the opening. Now granted, as soon as the sweep crosses the opening, it will break.
The images below show the same sweep used in the above 2008 image in 2009. I even threw in the section showing the dimensions to the opening and the top of the sweep...which is the "insertion" line for the sweep.


So, to recap...
- If you are using 2009, you can place sweeps along-side openings and not have to worry about where the insertion point of the profile is.
- If you are using 2008, you have to be careful when placing sweeps along-side openings. The insertion point of the profile can not touch the opening, or it will break the sweep. You can flip the sweep (using the flip arrows in an elevation or 3D view) and adjust the height accordingly. If you have a sweep between two openings, you need to change the insertion of the profile to not be on the edge of the profile...center is a good option.
Autodesk Acquires ECOTECT and Finalizes GBS
As part of its on-going commitment to support the practice of sustainable design and green building in the architecture, engineering and construction (AEC) industries, Autodesk, Inc. (NASDAQ: ADSK) today announced two acquisitions to improve building performance analysis in the building information modeling (BIM) process. Autodesk announced that it has completed the acquisition of substantially all the assets related to the ECOTECT software tools for conceptual building performance analysis from both Square One Research Ltd. and Dr. Andrew Marsh. Autodesk also announced that it has completed the acquisition of substantially all the assets of Green Building Studio, Inc., a provider of web-based whole building energy, water and carbon-emission analysis software.
The entire article can be read here.
Friday, June 13, 2008
New Revit Builds (Web Updates) are Available
The first Revit builds (or Web Updates are they are calling them) are now available from Autodesk for the 2009 products, currently for English versions. Other language versions of Web Update 1 will be available in the coming weeks. The builds can be found here...
New Revit Architecture Build (build number 20080602_1900)
http://usa.autodesk.com/adsk/servlet/item?siteID=123112&id=11017599
New Revit MEP Build
http://usa.autodesk.com/adsk/servlet/item?siteID=123112&id=11273489
New Revit Structure Build
http://usa.autodesk.com/adsk/servlet/item?siteID=123112&id=9281007
Here is the list of Web Updates for Revit Architecture according to the downloadable pdf...
Improvements made in Web Update 1 build (20080602_1900):
Note: It is highly recommended that you reinstall the content when installing Web Update 1 due to changes in the rendering library and other pieces of content.
Architecture/Platform Enhancements
Improves performance when modifying customer visibility settings for linked files, when many volumes exist that are bound by the linked file.
Improves the plotting consistency of certain components that are placed over hatched elements in coordination and architectural discipline views.
Rooms will now export Revit internal parameters for IFC.
When rendering, the progress bar reports correct percent complete.
“Intensity” on Decal Types dialog was changed to “Brightness” to match Help documentation.
Spot elevation with Display Elevation = Top & Bottom Elevation will now report the correct bottom elevation for sloped elements.
In plan view with medium or fine detail level, spot elevations now report the correct top or bottom elevation of a beam that is joined to a column.
Improves stability when changing the visibility of a link in a view template.
“Downlight – Spot” light family no longer has duplicate Tilt Angle parameter.
Lights that were in a light group that was deleted are no longer controlled by the deleted light group; instead they are controlled by the Ungrouped Lights status.
Improves the ability to enter custom DPI value in the Render dialog.
Improves stability when exporting to CAD formats.
Improves stability when closing SteeringWheels.
Improves stability when adding elements to a group.
Families that contain arrayed voids will now function properly in the project.
Improves stability for users with non-English operating systems when using the Open/Save dialog.
Notes created in Revit for a DWF markup object will now propagate to the DWF after selecting publish.
Enabling daylight portals will now affect the rendered appearance.
Spotting on interior renderings with many internal light sources no longer occurs.
Improves appearance of decals using cut-outs.
Corrects “Unable to Start” error when starting the application.
Model lines now remain in the correct design option when split.
Structural columns will now have a higher priority when joined to non-bearing and shear walls.
For sweeps on an arc wall, you now have the option to change sweep returns.
Restores some structural components in SouthAsiaLibrary content bundle.
API Enhancements
Parameter binding performance has been improved.
The JoinType method has been implemented for the LocationCurve of structural members.
Mullion LocationCurves are now accessible through the API.
External programs may now suppress VSTA startup warning messages.
The built-in parameter MATERIAL_PARAM_TRANSPARENCY now returns the correct set value.
Monday, May 19, 2008
Thermal Analysis with IES
I know I'm a little tardy posting this, but wanted to get it out here just in case someone hasn't seen the article yet.
Integrated Environmental Solutions (IES) launched VE-Ware sustainable design software that provides limited access to the company's Virtual Environment Apache thermal analysis software.
VE-Ware reportedly gives instant feedback on a building's energy consumption and carbon dioxide emissions based on real geometry and using international data on climatic conditions and the typical characteristics of different building, room, and system types. Because it facilitates iterative design, allowing the comparison of different design, layout, and system options, VE-Ware is appropriate for use at early stages of design.
Currently only models exported directly from Autodesk Revit can be accepted by VE-Ware. However, the goal is to make VE-Ware available globally to anyone who wishes to use it, regardless of vendor or system.
VE-Ware will be released in June 2008. However, interested parties can register now at the IES Web site.
The entire article can be viewed here.
Friday, May 16, 2008
Another App to tie Revit Models and Specifications
BSD (Building Systems Design Inc.) recently announced they are entering in the game of integrating specs and models with an upcoming integration manager called LinkMan-E™, which will work side-by-side with their new release of SpecLink-E. Speclink-E is the successor to the very successful BSD SpecLink+ software. According to the press release, LinkMan-E will enter the beta phase of its development following the first full release of SpecLink-E, currently scheduled for BSD’s 2008-2009 winter quarter.
If you or your company is a user of BSD SpecLink or trying to decide if it's time to integrate your model and specs, this is definitely something to keep an eye on.
Thursday, May 15, 2008
Tectonic BIM Library Manager now SmartBIM Library
Back in December, Reed Construction Data acquired Tectonic Partners and now they have launched SmartBIM solutions which will include SmartBIM Library™, SmartBIM Objects™ and RSMeans™ Quick Cost Estimator. The SmartBIM Library™ takes the place of the Tectonic BIM Library Manager, SmartBIM Objects™ sound like they are basically the objects that will be included in the Library, and RSMeans™ Quick Cost Estimator looks to be a tool that will allow Revit objects to be linked directly to RSMeans data. The press release can be read here and you can visit www.smartBIM.com for more information.
Tuesday, May 6, 2008
Autodesk Seek Released Today
Today, Autodesk released (see this press release) Autodesk Seek, a groundbreaking web service that allows architects, engineers and designers to search, select and specify building products using Autodesk’s advanced search technology. The technology has already been integrated into the 2009 products. If you haven't seen 2009 or maybe just haven't looked at the toolbars closely, there is a new toolbar for the Content Search.

Just type in what you are looking for (example; I was looking to see if Marvin had windows available, so I typed in Marvin) and as long as you are connected to the Internet, it will open up a browser and show you the results. It has quite a few file types you can search for, just take a look at the image below to see the types of files you can search for...

As the press release mentioned, the amount of content will continue to grow. I can only imagine how big of a database this is going to grow to!
Also, if you don't want to open up a piece of software, you can go directly to http://seek.autodesk.com/ to search for content.
Enjoy!
Tuesday, April 29, 2008
Dependant Views and Tags Issue Update
As I previously posted, there was an issue of Revit crashing when you tried to move a tag in a dependant view. Well, I tested this out in 2009 and it appears to be fixed. I also asked Autodesk support to verify this (as my support request was never updated) and they also were able to verify that the problem was resolved in 2009.
Dependant Views and Reference Section Update
As I previously posted, there was an issue with adjusting Section/Detail markers in Dependant Views. I just went through and tested the same thing in 2009 and it looks to be fixed. I also asked Autodesk support to verify this (as my Support Ticket was never updated and was still pending...) and they also were able to test the same process and said it was fixed in 2009.
Saturday, April 26, 2008
New Places in Revit 2009
 Something new and some may overlook it, but the new Places feature takes over for the Libraries in 2008. This is a nice new feature that allows users to quickly create shortcuts in left pane of the Open, Load (Families) or creating New files (families, projects) dialogs. This area isn't new to Revit, but how you add Places (folder shortcuts) to this area is different. Prior to 2009, you had to go into Settings->Options->File Locations and add folder locations to the Libraries area. When you did this, the locations you added were also placed in the Revit.ini file. This was great for deploying the same locations to other users. Now, in 2009 things change...just a little bit. You can still do the same process as pre-2009, but it's labeled as Places instead of Libraries. After that though, that's where things change.
In the lower left corner of the dialog (see pic above) there is a new button...Tools. If you select this button, you can "Add Current Folder to Places" or "Add to Favorites" (the Favorites folder in the Places pane). You can also Drag-n-Drop a folder from the right pane to the Places pane to add that folder to the Places list.
There is also a shortcut to get to the Places in Settings->Options->File Locations by right-clicking in the Places pane. So if you want to add a folder to the Places and also add it to the Revit.ini file on the fly, you can use this method. The nice thing is that you don't have to open an actual file to save the changes made to the Places list. If you hit Cancel, it will prompt you and ask if you want to save changes made to the Places list.
Besides this being a new feature, there's something else you really need to know. When you add a folder location to Places using the Tools button or by Drag-n-Drop, it IS NOT added to the Places list in Settings->Options->File Locations, thus not being added to the Revit.ini file. When you use either of the two methods just mentioned, the locations are actually stored in the Registry at HKEY_CURRENT_USER\Software\Autodesk\Revit\Revit Architecture 2009\Profiles\AllAnavDialogs. And actually, any changes made to the Places list is stored in this Registry location. So if you want to utilize the Revit.ini file to distribute Places, make sure you use either the right-click option to edit Places or go to Places in Settings->Options->File Locations. I'll post an update when the first Service Pack (web update) is released to see how the un-install and re-install affects the registry.
I also created a short video going through the process of using the Tools button and also using the right-click option in the Places pane to get to the Places locations...along with a couple notes on what I've mentioned above.
Demolish a Door and Keep the Opening
I get this question quite a bit when users start using Phases on a project...How do I demolish a door (or window) and remove the wall that it places automatically?
First, the reason why you can't just delete the wall. The wall that is placed is actually tied to the door (or window). If you try to erase the wall that is placed, it will give you an error message that states "Can't delete infilling element without deleting its insert or host." So if you can't delete the infill, then how do you keep the opening created by the door? I'm glad you asked...
All that really needs to be done, is to create a new Opening in the newer construction phase that is the exact same size as the opening the demolished door would create. If you really think about it, you are creating a "new" opening where the door existed.
Now, you can't edit the profile of the wall that is placed, so you have to use an Opening family. Out-of-the-box, there is a Cased Opening family that you can use as a start. If you don't want the trim, simply save-as (as a new name) and cleanup the family so you just have the opening in the wall (keep the parameters needed for the opening size of course). Since this family is categorized as a Generic Model family, you'll use the Component Tool to place it.
You can treat it just like a door and create different types for sizes, or change the Width and Height parameters to be instance based. (If you are unsure how to do this, see this post)
Changing a Parameter from Type to Instance
For the most part, if you want to change a parameter from Type to Instance (or vice-versa) you can edit a parameter in the Family Types. But there are some parameters that you can't modify on the Family Types that come out-of-the-box. Take the door family for instance; if you go into the Family Types and select the Thickness parameter, you can't select the Modify button under Parameters on the right side (see pic below).

In order to change a parameter like this from Type to Instance, you actually do it outside the Family Types dialog. Go to the view where the dimension is labeled and select the dimension. Now look up at the Options Bar...you'll see a check box where you can make that Label (parameter) Instance based. This works for ANY parameter tied to a dimension.

Sunday, April 20, 2008
Revit Architecture 2009 System Requirements
As described on Autodesk's web site, here are the Systems Requirements and Recommendations for 2009...
System Requirements
- Windows® XP Home, Professional and TabletPC (SP1 or SP2), Windows XP Professional x64 Edition,Windows Vista® 32 bit (Business, Premium and Ultimate), Windows Vista 64 bit (Business, Premium and Ultimate)
- Microsoft® Internet Explorer® 6.0 SP1 or later
- Intel® Pentium® 4 1.4 GHz or equivalent AMD Athlon® processor
- 1 GB RAM
- 1280 x 1024 monitor and display adapter capable of 24-bit color
- 3 GB free disk space
- MS-Mouse compliant
- Download and Installation from DVD
System Recommended:
- Windows XP Professional SP2 or later, Windows XP Professional x64 Edition
- Microsoft® Internet Explorer® 6.0 SP1 or later
- Intel™ Core® 2 Duo 2.40GHz or equivalent AMD Athlon® processor
- 4 GB RAM
- 1280 x 1024 monitor and display adapter capable of 24-bit color.
- Dedicated video card with hardware support for OpenGL spec 1.3 or later
- 5 GB free disk space
- MS-Mouse compliant
Notice the Recommended specs do not include Vista and it's interesting that it has XP x64 since Revit isn't YET (I wouldn't be surprised if it happens this year) a 64bit application. Although, the 64bit OS does give you the ability to get that extra GB of RAM, which is always nice. The biggest one I see in the requirements is the Dedicated video card with OpenGL. When my company was looking at getting new laptops for us, they ran some tests on the graphics card and found having a dedicated graphics card worked much better than a shared card. (If I can get a hold of those results, I will post them.)
Oh, as far as what we ended up getting for laptops, here's the specs...
- HP Compaq 8710w (Mobile Workstation)
- Windows Vista® Business 64-bit OS, Dual Boot Windows XP 64-bit OS
- Intel™ Core® 2 Duo 2.00GHz
- 4 GB RAM
- NVIDIA Quadro FX 1600M
Wednesday, April 16, 2008
Revit 2009 Download Available
It's finally here, the Revit 2009 product is available for download.
You can download the 2009 (English) products here...
Revit Architecture 2009
http://usa.autodesk.com/adsk/servlet/item?siteID=123112&id=11017599
Revit Structure 2009
http://usa.autodesk.com/adsk/servlet/item?siteID=123112&id=9281007
Revit MEP 2009
http://usa.autodesk.com/adsk/servlet/index?siteID=123112&id=9262907
Please remember to download the appropriate product....regular vs. suite. It will matter when it comes time to authorize your software.
Friday, April 4, 2008
Revit 2009 What's New Videos
The reseller I work for, MasterGraphics, just launched a new page that includes videos for what's new in a few of the 2009 Autodesk products. For Revit Architecture, there are 12 short videos that were produced by my colleague David Lidbury. You can check out these videos at www.masterg.com/2009videos
Sunday, March 30, 2008
Revit Architecture (RAC) 2009 Release Date!
EDIT: Please see the post http://revit-archcenter.blogspot.com/2008/04/revit-2009-download-available.html for the links to the now available downloads!
It's finally here, the release date for the Revit 2009 products! And what date is it...well, they will all start to ship and be available on April 15th!!! Two weeks can't come any sooner!
Note: Please keep in mind that occasionally a FCS (First Customer Shipment) date may slip due to unforeseen events.
Revit® Architecture
April 15
AutoCAD® Revit® Architecture Suite
April 15
AutoCAD® Revit® MEP Suite
April 15
Revit® Structure
April 15
AutoCAD® Revit® Structure Suite
April 15
Monday, March 24, 2008
Some 2009 Product Ship Dates Released
Yes, the time has come and shipping dates are starting to come out regarding the Autodesk 2009 products. Unfortunately, Revit is not on the list quite yet. Here are just some (not all) of the products that will be shipping in the next week or so...
AutoCAD® 2009
March 25
Autodesk® Design Review 2009
March 25
Autodesk® DWF™ Writer 2009
March 25
AutoCAD® Architecture 2009
March 26
AutoCAD® MEP 2009
March 26
Autodesk® NavisWorks® Review 2009
March 31
Autodesk® NavisWorks® Simulate 2009
March 31
Autodesk® NavisWorks® Manage 2009
March 31
Autodesk® 3ds Max® 2009
March 31
Autodesk® 3ds Max® Design 2009
March 31
Stay tuned as I will post the Revit dates as soon as they are released! (If I had to guess, it's probably going to be around the 2nd week of April based on previous years.)
Thursday, February 21, 2008
Creating a Wall under a Sprial or Curved Stair in RAC 2009
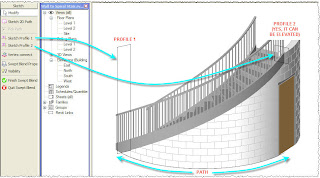
Many have asked the question and there's really never been a great way to deal with it...creating a wall that follows the slope of a spiral or curved stair. Well, with the introduction of the Swept Blend in Revit Arch 2009, it can be done quite easily!
Once the program is officially released, I will post more detailed instructions on how you can create something very similar to what I have below... I really just wanted to give you a taste of what's to come with RAC 2009! Since the release of the product isn't finalized (as far as I know), I don't want to spell out the details just in-case something changes with the feature.
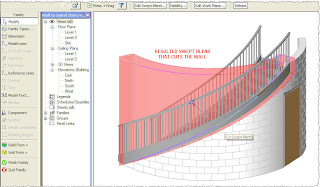
Contents of the Swept Blend Sketch... (One of the keys is having the profile high enough to cut the entire wall's height)
The Finished Swept Blend...
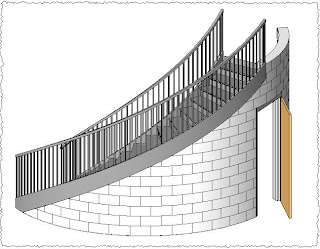
The Finished Product! (Yes, I modified the door to show open for this image :))
Once the program is officially released, I will post more detailed instructions on how you can create something very similar to what I have below... I really just wanted to give you a taste of what's to come with RAC 2009! Since the release of the product isn't finalized (as far as I know), I don't want to spell out the details just in-case something changes with the feature.
Contents of the Swept Blend Sketch... (One of the keys is having the profile high enough to cut the entire wall's height)

The Finished Swept Blend...

The Finished Product! (Yes, I modified the door to show open for this image :))

Thursday, February 14, 2008
Revit Architecture 2009 Updated and New Features!!
It's finally OFFICIAL... as of today we were released from our confidentiality agreement to discuss the new features. Yes, new and updated features for Revit Architecture 2009 can now OFFICIALLY be shared!!
There are 3 main buckets of enhancements...Improved Design and Visualization Tools, Better Control and Flexibility, and Improved User Interaction. I've given a very brief description of each enhancement for now and will post more about each one as time permits. This list may not be all of the enhancements and I will post more as they become available...or I find them! I will also be posting more about each topic with examples through screen shots or small video clips.
Improved Design and Visualization Tools
Rendering Enhancements
- The AccuRender® rendering engine has been replaced with the mental ray® rendering engine.
Swept Blend
- A new tool blending a Sweep with a Blend.
Curved Edges in Sloped Slabs
- You can now have cureved edges in your floors and roof and utilize the Sloping tools.
Mass Floor Area and Volume
- When you create mass floors, Revit Architecture now calculates the area and perimeter of each mass floor and the exterior surface area and volume of the slice of space above it. Mass floors can be tagged individually and scheduled.
Sloped Pads
- You can now have sloped Pads by utilizing a Slope Arrow.
Better Control and Flexibility
Room Enhancements
- Room Volume Calculations can now be set by Level Type, Volume calculation always go to the finish face, Rooms can extend down as well as up, and you can select Rooms in Sections and Elevations.
- Room Graphics in Section and Elevation views will now display the accurate boundary, you can modify the top and bottom limits with grips, and Color Fills (Schemes) can be applied in Section & Elevation.
- Room Bounding elements can now be Pads as well as Links.
- Rooms can be tagged using Tag all not Tagged, Room Tags can now move in other views if the room is moved and the tag resides outside the boundary.
Dimension Enhancements
- Dimensions can be overridden with text (but not with another dimension value). You can now also add text strings above, below, before and after the dimensions.
- Dimension to Intersections and to Circle, Arc, or Ellipse Centers.
- Dimension text now has the same formatting options as other text.
- Baseline Dimensions and Ordinate Dimensions are now available.
Revision Enhancements
- Revisions can now be numbered alphabetically, numerically, or as a combination of both.
- Revisions can build a table from the bottom-up, not just top-down.
- Revision schedules can be rotated on a sheet.
Unit Formatting Enhancements
- A new Currency value has been added for Numbers and Cost fields.
- A new Slope unit has been added to report slope.
Phasing Graphic Override
- Phasing graphic overrides now use an interface consistent with Visibility/Graphics
- Line styles: color, weight, pattern (for both cut/projection)
- Fill patterns: visibility, color, style (for both cut/surface)
Links
- Now have the ability to control the display of linked views in section, elevation, and 3D views.
- Phase Mapping Between Linked Projects
Linework Additional Edge Types
- The Linework Tool now works on Edges in linked Revit files when displayed "By Host", Polylines (generally from imports), and Projection edges caused by plan regions.
DWFx Support
- Support is now included for Microsoft’s XML Paper Specification (XPS) format of easy distribution on the Vista® platform supported by the XPS Viewer.
Improved User Interaction
Recent Files Window
- Upon start-up Revit Architecture will now display a graphical list of recently edited files and families, and links to Help, Tutorials, and content.
View Navigation Tools
- The ViewCube and SteeringWheels have been added to Revit Architecture.
Warning Enhancements
- When an element that is associated with a warning is detected, the element will display a small warning icon in the Options Bar.
- The Review Warnings dialog has a new Export command.
Granular View Templates
- View properties can now be applied selectively using view templates.
Snap Overrides
- Snap overrides are now listed under a "Snap Overrides" menu accessible from the right-click context menu.
- The "Close" snap override has been created to provide an ability to snap to the beginning of a chain of two or more lines.
Tuesday, February 12, 2008
Autodesk® to Acquire Green Building Studio®
Just announced today...
After nearly 10 years of market changing innovation, Green Building Studio is delighted to announce we have signed an agreement for Autodesk, Inc. to acquire our assets. In other words, our Green Building Studio (GBS) web service will soon join the Autodesk product family. Please be assured that our talented team will continue selling, training, and supporting architects as they use our web service to design carbon neutral buildings today and in the future.
“Autodesk is committed to providing technology that makes sustainable design easier and more efficient,” said Jay Bhatt, senior vice president, Autodesk AEC Solutions. “We look forward to adding the Green Building Studio technologies to the Autodesk portfolio and helping our customers more easily leverage the coordinated, reliable data created in the Revit® platform for building information modeling (BIM) to help predict performance and design buildings with reduced environmental impact.”
After closing this deal, Autodesk also plans to continue support for the Green Building Studio web service, carbon neutral building design training, and to strengthen the web service’s integration with its BIM software. The gbXML schema will remain an open industry standard, and the GBS web service will continue to be available to any other BIM software.
“We have partnered with Autodesk for many years, and commend their ongoing support for sustainability,” said John Kennedy, President & CTO, Green Building Studio. “We are eager to contribute our industry expertise in green buildings to drive mainstream adoption of sustainability and accelerate the AEC industry’s transition to carbon neutral buildings.”
To learn more about Green Building Studio, go to...
http://www.greenbuildingstudio.com/gbsinc/index.aspx
It will be exciting to see how Green Build Studio will interact with Revit in the future with this acquisition!
2009 Revit Platform Announced - Architecture, Structure and MEP!!
Autodesk World Press Day has arrived and here's a quick peek at some of the Revit 2009 updates for all 3 products...Architecture, Structure and MEP!! As far as when it's going to be released, availability will vary by country and more details and purchasing options will be accessible starting March 25, 2008. As soon as I hear a definite date from Autodesk when the products will be available, I will post it!
Ok, so for the meat of the subject....
Ok, so for the meat of the subject....
New updates to the Revit platform include:
-- Revit Architecture 2009 (BIM for architects and designers) allows
customers to capture early design concepts with improved analysis and
visualization capabilities via:
- Increased sustainable design and energy analysis capabilities
through easy exchange with partner applications - Improved visualization functionality with the new Mental Ray
engine for rendering, improving speed, quality, and usability
-- Revit Structure 2009 (BIM for structural engineers, designers and
drafters) has been enhanced with greater modeling and documentation
capabilities and is compatible with the newly acquired Robobat
solutions. The AutoCAD Revit Structure Suite now includes AutoCAD
Structural Detailing, enabling:
- Steel and reinforced concrete detailing and shop drawings
- State-of-the-art formwork drawings
-- Revit MEP 2009 (Revit for MEP engineering) provides customers with
detailed, specified modeling functionalities, including:
- Air handlers, commercial condensing units, packaged rooftop units,
and high-efficiency water source heat pumps
To view the entire article regarding the 2009 AEC products, go to
http://biz.yahoo.com/prnews/080212/aqtu085.html?.v=37
More to come in the near future!!!!
Friday, February 8, 2008
Curved Wall with a Curved (Arc'd) Top
A while ago I was going past a building that had this spline like shaped wall and the top of it wasn't straight or even at an even slope...it was curved. Now, when I was in a design firm, I always looked at a building thought "how would I build that or document that"? Now that I'm teaching and helping design firms implement Revit, I now look at building and think along the same lines, except I also think "how would that be modeled in Revit"?
Well, that's one of the first things I did when I had a free moment to play around with it. Of course I could do an in-place wall, but I really didn't feel like modeling all the layers of a cavity wall. Then a little light bulb flashed around in-place elements...you can turn off their visibility. So, I created an in-place floor (could have been roof, ceiling, etc.) and gave it a unique name so I new what it was being used for. I then created a very thin extrusion for the floor shape and finished off the family. I kept it visible so I could attach the wall to the in-place floor. Once that was accomplished, I edited the in-place floor, went to the Element Properties and un-checked Visible. Finished the family and there it was...a curved wall with a curved top! The attached pics show turning off the visibility and how to actually edit the in-place object once it's turned off. In order to edit the "invisible" object, you can go to the Project Browser and use the Select all Instances.
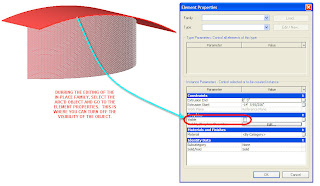
Turning off Visibility off In-Place Family
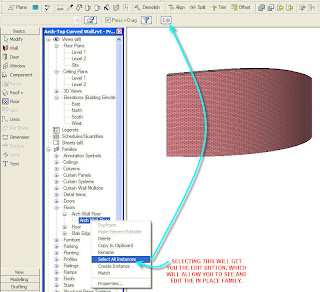
Selecting the "Invisible" In-Place Family
Now, another method with in-place families would be to use an in-place family (I used a wall) and make it a Solid Void. Create the shape just like the other method above, except that you have to make sure the Void is tall enough to "cut" the height of the wall. Then you use the Cut Geometry Tool to make the Void cut the Wall and then finish the in-place family.
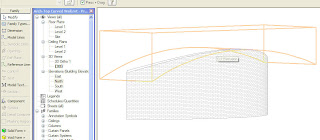

Thursday, February 7, 2008
WinEstimator releases DesignEst Pro
WinEstimator, Inc., a global leader in estimating software development announced the release of DesignEst Pro. DesignEst Pro leverages the “building information model” (BIM) technology to quickly produce both conceptual budgets and detailed cost estimates.
DesignEst Pro links the object and property library in Revit Architecture with the object and properties in a WinEst cost database, allowing both conceptual and detailed estimates to be developed as the building is being designed. This dynamic link provides support for unlimited what-if scenarios during the design phase of the project. As design alternatives are explored, the cost estimate is changed accordingly.
DesignEst Pro does require Revit Arch 2008. You can take a look at all the features at - http://www.winest.com/products_designestpro.aspx.
BIMWorld Releases BIMCONTENTManager 2008
Today I received a notice that BIMWorld has released their BIMCONTENTManager 2008. It not only helps you organize your Revit families, but will also help those who are trying to manage AutoCAD blocks as well.
Take a look for yourself at - http://www.bimcontentmanager.com/ or take a look at the home page at - http://www.bimworld.com/ to see all the key features.
If you haven't been to BIMWorld, I highly suggest taking a look at what they have to offer. They provide content for almost all of the computer drafting/modeling software out there.
Tuesday, January 15, 2008
Aligning Model Fill Patterns Follow-up
There have been a few posts out on the web regarding aligning model patterns and Ian recently posted this nice little post on aligning patterns using the Align command.
What I would like to do is go a little more in-depth on aligning (modifying) model patterns using a few different methods.
The first, which Ian has described, is using the Align tool. This is one of the easiest and fastest ways to get an edge of a model pattern in-line with an edge of any another object. You typically just select the edge of an object (or line, or reference plane, etc.) that you want to the hatch pattern to align to, then tab through to get to the hatch line you want to align, select it (left-click it) and it’s aligned.
The next method is using the Move tool to move your pattern lines to a new location. This works great for moving ceiling grids or cmu/brick patterns to have a new “origin”. You can select end points, mid points, etc. of a model pattern line and move it to where-ever you want.
Another method is to use the Rotate tool. Many use this method to rotate the ceiling grid lines to be something else besides what they originally come in as. (Side note…if you ever wondered how the ceiling grid lines aligned themselves when you place a ceiling, they align themselves with the longest wall’s orientation.)
You can also use dimensions to locate your model patterns. This opens a whole bunch of opportunities to modify the model pattern location. Lock a line a certain distance away from another object, move the pattern a certain distance away from another object, etc. A great way to re-center your ceiling grid (or to keep it centered on a grid line) is to use a dimension and equal it out. Keep the equal constraint and it will stay centered between the walls.
The last one (at least that I’m going to talk about here) is using the Rotate tool….yes, the Rotate tool again. Have you ever tried to align a vertical pattern line in elevation on a curved wall… you can’t use the align tool or move it horizontally. So how do you actually get it to move horizontally?? Yep, you guessed it, the Rotate tool. But you’re probably thinking, how is the Rotate tool going to help me in elevation? This is where you have to utilize two open views, an elevation and plan view. With both views tiled (Window->Tile), go to the elevation and place a reference plane vertically where you want the vertical pattern line to be and one where pattern line currently sits. Next, tab through until you can select the pattern line. With the line selected, go over to the plan view (click on the title bar to activate that window), and then select the Rotate tool. Place the origin (or make sure it’s placed) at the center of the arc (or circle), then select a point on the reference plane that represents the pattern location. Once you have the first point selected, select a point on the reference plane that represents the new location. Now, go back to your elevation and there is your pattern re-aligned. The video below shows the process.
If you have any other methods you would like to share, let me know and I’ll post them (with credit or course).
Monday, January 7, 2008
Update Ready for download for 2008 January Bug
Here's a response (and fix!!!!) directly from Autodesk regarding the Failed to Open and Unspecified Error Messages....
I am happy to announce that Autodesk has fixed the “Y2K8 bug”!We just posted a new build (20080101_2345) of Revit Architecture 2008, Revit Structure 2008, and Revit MEP 2008 that fixes the problem. It is still considered Web Update #3 because replacing the existing file was the fastest method of delivering it to the public. Therefore, the executable file names are the same as the previous build (20071102_2345).We have updated the Web Update Enhancement Lists to add the following items:
I would also like to inform everyone that we are only releasing this fix in the English version. Because of the time necessary to localize the update for the other languages, it would not be ready before February 1, 2008 when the problem will go away.
Here are the links to the updated downloads...
RAC: www.autodesk.com/revitarchitecture-download
RST: www.autodesk.com/revitstructure-downloads
RME: www.autodesk.com/revitmep-download
Thanks Autodesk for getting a solution out in a relatively timely manner...but sorry to hear that it's only available for the English version at this time.
I am happy to announce that Autodesk has fixed the “Y2K8 bug”!We just posted a new build (20080101_2345) of Revit Architecture 2008, Revit Structure 2008, and Revit MEP 2008 that fixes the problem. It is still considered Web Update #3 because replacing the existing file was the fastest method of delivering it to the public. Therefore, the executable file names are the same as the previous build (20071102_2345).We have updated the Web Update Enhancement Lists to add the following items:
Improves stability when editing groups, saving views/groups to the library or creating a new project with template set to “None”.
Improves stability when upgrading or linking a project from Autodesk Revit Building 8.1/Revit Structure 2 or older.
I would also like to inform everyone that we are only releasing this fix in the English version. Because of the time necessary to localize the update for the other languages, it would not be ready before February 1, 2008 when the problem will go away.
Here are the links to the updated downloads...
RAC: www.autodesk.com/revitarchitecture-download
RST: www.autodesk.com/revitstructure-downloads
RME: www.autodesk.com/revitmep-download
Thanks Autodesk for getting a solution out in a relatively timely manner...but sorry to hear that it's only available for the English version at this time.
Subscribe to:
Posts (Atom)