EDIT (4/1/08) - A new post has been added regarding the release date of Revit...Revit Architecture (RAC) 2009 Release Date!
EDIT (2/17/08) - A new post has been added regarding the new features of Revit Architecture 2009...Revit Architecture 2009 Updated and New Features. As far as a date of when it will be available, it has yet to be determined (publicized) and I will post it as soon as it is.
Lately I've been getting quite a few people asking about Revit 2009 and when it's going to be available/released or if I know what's going to be changed, updated, added, etc. to the 2009 release.
Well, about the only thing I know (and even then it's a guess) is that it will be released about the same time as the previous few years....around the end of March or early April when all the other Autodesk products are released. What's going to be included is only known by Autodesk and maybe some very early testers that Autodesk allows to test the program at this point.
If I remember the past releases correctly, Beta testing usually starts after the first of the year and those beta releases include what's new and updated. Even then, that information can not be released to/shared with the public until Autodesk gives the ok. Beta testers can share information with each other through a web site called MyFeedback. Anyone can apply but there is no guarantee that you will be chosen to Beta test. Beta testing requires feedback to Autodesk on the new features as well as bugs in the program. As being with a reseller we do get Beta software, but again we are not at liberty to discuss that info with the general public.
As soon as Autodesk gives the ok (which is usually when they let the public know when the software will be available) I will post as much as I can about Revit Architecture 2009!
Monday, December 17, 2007
Thursday, December 13, 2007
IES Revit Architecture 'Plug in' Now Available
Great news for the Architectural folks to analyze their building’s performance with IES!
Here's the link to the news article from IES...
http://www.iesve.com/content/default.asp?page=s62&newsid=2470&back=s59
And, you can download the plug-in here...
Revit RAC Plug-In
Hopefully I can manage to get some time to test it out and report back!
Here's the link to the news article from IES...
http://www.iesve.com/content/default.asp?page=s62&newsid=2470&back=s59
And, you can download the plug-in here...
Revit RAC Plug-In
Hopefully I can manage to get some time to test it out and report back!
Tuesday, December 11, 2007
Reed Construction Data Acquires Tectonic Partners Inc
This is some exciting news for those who have been using or looking to use Tectonic... and anyone looking to integrate cost estimating into their Revit projects! For more on Tectonic, please check out their site through the link in the below press release. I'm also looking into posting some more info on Tectonic in the near future once I get the latest release installed.
Reed Construction Data Acquires Tectonic Partners Inc
(Atlanta, GA) Dec 09 2007
Construction information provider to deliver industry-defining technology for BIM
Reed Construction Data today announced the acquisition of Tectonic Partners Inc., a leading developer and service provider of building information modeling (BIM) for the architectural, engineering and construction industries.
The acquisition represents a significant strategic move by Reed Construction Data to become a leader in the emerging building information modeling space and complements the strategic partnership with RCMS Group announced earlier this year.
An agreement between the two companies was signed today in Atlanta. The acquisition will formally close Feb. 1, 2008.
The combination of Reed Construction Data and Tectonic will give architects, engineers and contractors (AEC) a powerful set of solutions for creating and managing BIM content on their desktops, as well as integrating RSMeans’ industry-leading cost data into the objects and the drawings themselves.
“By combining the power of RSMeans data and other Tectonic applications, we’ll be able to make a huge impact in the daily business lives of the AEC community,” said Iain Melville, CEO of Reed Construction Data. “I am excited about the potential to create rich BIM content for BPMs and to create many new products and services in the future.”
“Reed Construction Data and Tectonic together will move BIM to truly integrate RSMeans data into the work flows of architects, engineers and contractors,” Melville said. “We think this is powerful marriage of both BIM technology and integrated data.”
As part of the agreement, Arol Wolford, CEO of Tectonic, and one of the leading innovators in the industry, will stay on as a consultant to Reed Construction Data.
“I’m very excited to work alongside Reed and to match our products and services with the strong content that they provide,” Wolford said. “BIM has opened up countless opportunities in our industry, and the combination of our companies will give us the power to deliver full service BIM options to the AEC community.”
Tectonic provides several unique products and services, including BIM Library Manager, a software application for the organization and management of Autodesk Revit families, which helps assist in efficient creation of BIM.
Tectonic also has built an expansive library of BIM objects and is in the process of developing a powerful quantity take off tool to further meet the needs of the AEC community.
The emerging BIM technology provides consumers with the ability to improve visualization, coordination, simulation and optimization, which translates into direct advantages such as cost savings, fewer errors, productivity gains and the ability to manage building information throughout a project’s entire lifecycle.
Link: http://www.reedconstructiondata.com/press-releases/press-release/reed-construction-data-acquires-tectonic-partners-inc/
Thursday, December 6, 2007
Sheet Index Organization for Browser Sheet Organization
As I have previously posted, you can setup new parameters to to organize your sheet index but you may not be aware you can also use those parameters to organize your sheets in the Project Browser.
First, go to the Project Browser and right-click on Sheets and then Properties. What you'll need to do next is select a type other than All since you can not duplicate the All type. Hit Duplicate and rename it to whatever you want. Then, hit the Edit button for Folders and set the organization as in the image below...

Once you have the organization set, your browser will be organized in the same manner as your Sheet Index list. The only thing that won't happen for the organization is the order of the sheets in the browser...they will still be in alpha-numerical order instead of using the Sheet Order Number like the Sheet Index does.

Sunday, December 2, 2007
Need Floor to Floor (Level to Level) 3D Views?
Over the past month or so, I've had a few people ask me how they could get a 3D view of each individual floor for exporting out or just for presentation purposes. It's definitely do-able, but it just takes a little bit of setup to accomplish it.
1. Select any one of the overall building elevations and make as many copies as floor needed...one for each floor.
2. Rename them to something that will correlate each one to the floor it’s going to look at.
3. In each elevation, turn on the crop region and crop the elevation from Level to Level…i.e. Level 1 to Level 2. The crop region should snap to each level.
4. Once all the elevations are created, you’ll need to make the same number of 3D Views that basically duplicate the names of what you just did for the elevations.
5. For each 3D View, you will open one at a time and do the following to each one...
a. Go to the View (pulldown menu)->Orient->To Other View
b. From the list, select the Elevation name that corresponds to the 3D View name.
c. This will give you a “flat” 3D elevation, which you can orbit to view in 3D.
At this point, you are ready to do what you need to do... exporting to dwf, dwg, etc. or creating presentation views. If you are going out to dwg, you will have to do a little cleanup as the Section Box will be present.
Monday, November 26, 2007
New Service Pack - SP3
While I was on vacation, Revit Arch got a new service pack released. Here are the improvements that were provided.
Improvements made in the current Web Update SP3 build (20071109_2345):
• Allows the ability to array face-based families placed on a vertical face.
• Allows the ability to maintain face-based instances on curved surfaces of a Revit file linked into Revit Architecture software when the link is unloaded.
• Improves stability when selecting sections.
• Allows the ability to insert an electrical receptacle into a legend view.
• Improves stability when accessing the Help menu in Revit Architecture on a computer with the Microsoft Windows Vista™ operating system.
• Improves stability when applying a view template to a sheet.
• Improves performance when views contain many objects with overridden graphics by element.
The link to download the latest SP is - http://usa.autodesk.com/adsk/servlet/item?siteID=123112&id=9408083
Thursday, November 15, 2007
Nested Familes and File Size Test
A few weeks ago, a colleague of mine (David Lidbury) and I were having a discussion regarding nested families and their effect of the size of a project. We both had initially heard that nesting families wasn’t the best thing to do as it increased the file size, but neither one of us actually have run across that problem. We both have utilized nested families with customers and didn’t have any trouble. So, David did some testing to see what would happen to a file’s size if he built a door that was made of nested components versus a door that wasn’t. The results were a little surprising….
The set up
240kb Door without nested parts
HM door frame with the same parameters as listed below but with all the needed parts (Panel, Plan & Elevation swing) in the same family file.
316kb Door with nested parts
HM door frame with parameters to allow for full flexibility (Separate Fame Head and Jam parameters, etc.). This file is the base for the full family file. Nested families included; Door Panel, 2D Plan swing, Elevation plan swing
Conclusion #1 – The family size with nested parts is 76kb larger
Test - 1
I created a 22,000sf building then saved it as two separate files. I then added 36 doors of each type in there respective files.
1,208kb 36 doors without nested parts
1,308kb 36 doors with nested parts
Conclusion #2 – The file size with nested parts is 100kb larger
Test – 2
I added 99 additional levels and copied the first level up 99 times. This resulted in a door count of 3,564.
14,972kb 3,564 doors without nested parts
14,884kb 3,564 doors with nested parts
Conclusion #3 – The file size with nested parts is 88kb Smaller. This is obviously a surprise (and I did double check which file was which). The file size actually gets smaller as more nested families are added.
Of course this was a very simple project with mainly walls and doors. But, even with taking the project further and adding all the other components a building would have, the family built from nested components really doesn’t have an effect on the file size.
Wednesday, November 14, 2007
Dependant Views and Tags Issue
Another issue has been discovered with dependant views and adjusting tags. If you adjust the tag (say an equipment tag) in the main view, everything is fine. But if you adjust the tag in the dependant view without moving it in the main first, or not having the main view open with the dependant, Revit will crash. I sent the file to Autodesk along with the journal file and they were able to reproduce the problem. At this point, "The workaround is to make sure that the original view is opened at the same time. You will be able to then move the tag in the dependant view without any issues."... was the response from Autodesk. They also said that "The underlying issue for this case is being addressed by our development team on a future release."
So, hopefully in the next build or release...which at this point in the year I would assume the next release, the dependant views will become more stable.
So, hopefully in the next build or release...which at this point in the year I would assume the next release, the dependant views will become more stable.
Sunday, November 4, 2007
Dependant Views and Reference Section Adjustment Issue
This is an issue that many people may never run into, but if you do you'll realize it's not fun! The problem comes about when you are using dependant views and you have reference sections pointing to another view and you modify the section mark in it's length and/or head/tail location. If you place a reference section and say stretch it out, or need to change the head to the other side, the section will revert back to it's original placement location (before you made any changes to it) as soon as you adjust the crop region in the dependant view. Please take a look at the attached video for a visual of the issue. This is from an actual project where the person had a lot of referenced sections. The video zooms into the dependant view so you can see the sections changing as the crop region was adjusted.
I've forwarded this issue to Autodesk and at this point "The underlying issue for this case is being addressed by our development team". So if we all keep our fingers crossed, they will be able to fix this issue in a new build or in the next release (2009).
At this point, the only thing I can think of as a work around is to adjust your crop regions first, then adjust your reference sections to be the way you want them. But even then, if you have to make an adjustment to the crop region, all bets are off.
Sunday, October 28, 2007
Temporary Dimension Size Issue
Many people have trouble with the size of their Temporary Dimension size being extremely small. In the last "build" (or service pack as they are now referring to them) for Revit, it noted that you can now change the size of the temporary dimensions in the reivt.ini file.
Check out the Autodesk support solution - ID: TS1074426 at http://usa.autodesk.com/adsk/servlet/ps/item?siteID=123112&id=10024530&linkID=9243099 for instructions on how to add the Graphics information to your revit.ini file.
This works great...even for presenting Revit to a group. Take a look at the image below...just doubling the default value (8 to 16) makes a big difference.

One thing to note...you have to install the latest build of Revit before this will work.
Saturday, October 27, 2007
Sheet Index Organization
Ever wonder how to get your sheets to be organized the way YOU want them and not simply in alpha-numeric order?? Well, below is an example of how you can accomplish this very thing.
You can accomplish this by adding parameters to your sheets. These parameters should ideally be added to the template file so they are always available to new projects. They can also be added to existing projects to update them to have this organization. The other method is to use/create shared parameters, but it is not necessary since these parameters will not be used in tags. The exact wording of the parameters is not necessary; these are only given as examples. You can create the names of the parameters how-ever you feel.
Start off by going to Settings->Project Parameters.
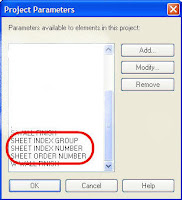
Click on the Add… button and at a minimum, you will need to add the SHEET INDEX GROUP and SHEET INDEX NUMBER parameters.
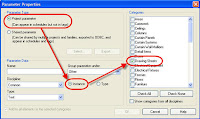
Select Project parameter, then make sure Instance is selected. Then select Drawing Sheets from the Categories list…this will add the parameters to the properties of the sheets. Type in the name of the parameter and make sure the type is set to Text. The “Group parameter under:” is up to you. Follow this process for all the parameters you are going to add for the drawing list organization.
Once you have all the parameters added, you will then see these parameters when you look at the Instance Parameters of your drawing sheets. (Figure 1)
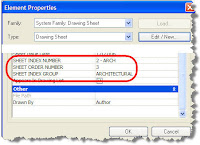
Figure 1
The reason for the Sheet Index Number being 2 – Arch is for the Sheet Index order (see Figure 2). In this example, the values used were…
1 – Gen
2 – Arch
3 – Int
4 – Plumb
5 – Mech
6 – Elec
If you wanted to add Civil, all you need to do is give it the order number (say 1), then re-number the rest.
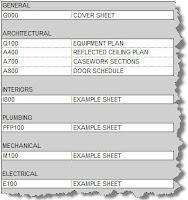
Figure 2
In order to get the above, you will make the Drawing List schedule with the following properties.
You can accomplish this by adding parameters to your sheets. These parameters should ideally be added to the template file so they are always available to new projects. They can also be added to existing projects to update them to have this organization. The other method is to use/create shared parameters, but it is not necessary since these parameters will not be used in tags. The exact wording of the parameters is not necessary; these are only given as examples. You can create the names of the parameters how-ever you feel.
Start off by going to Settings->Project Parameters.

Click on the Add… button and at a minimum, you will need to add the SHEET INDEX GROUP and SHEET INDEX NUMBER parameters.

Select Project parameter, then make sure Instance is selected. Then select Drawing Sheets from the Categories list…this will add the parameters to the properties of the sheets. Type in the name of the parameter and make sure the type is set to Text. The “Group parameter under:” is up to you. Follow this process for all the parameters you are going to add for the drawing list organization.
Once you have all the parameters added, you will then see these parameters when you look at the Instance Parameters of your drawing sheets. (Figure 1)
Figure 1
The reason for the Sheet Index Number being 2 – Arch is for the Sheet Index order (see Figure 2). In this example, the values used were…
1 – Gen
2 – Arch
3 – Int
4 – Plumb
5 – Mech
6 – Elec
If you wanted to add Civil, all you need to do is give it the order number (say 1), then re-number the rest.

Figure 2
In order to get the above, you will make the Drawing List schedule with the following properties.

SHEET ORDER NUMBER is only needed if you want full control of the order of the sheets in the index. This parameter will allow you to completely control the order of your sheets per Group instead of them being in alpha-numeric order.
You can then make the SHEET INDEX NUMBER, SHEET ORDER NUMBER and SHEET INDEX GROUP hidden fields in the schedule since you don’t need to see them on your sheet. I would however duplicate this schedule and keep these 3 parameters visible for ease of change and applying the values.
You can then make the SHEET INDEX NUMBER, SHEET ORDER NUMBER and SHEET INDEX GROUP hidden fields in the schedule since you don’t need to see them on your sheet. I would however duplicate this schedule and keep these 3 parameters visible for ease of change and applying the values.
Thursday, October 25, 2007
My First Blog Posting!!
Hello Everyone...
First off thank you for navigating to my Revit Architecture blog. I plan on posting tips and tricks, issues to watch out for, updates, etc. Hopefully you will find the information I post helpful/useful and I will try to keep it updated as much as possible.
First off thank you for navigating to my Revit Architecture blog. I plan on posting tips and tricks, issues to watch out for, updates, etc. Hopefully you will find the information I post helpful/useful and I will try to keep it updated as much as possible.
Subscribe to:
Posts (Atom)